# Auto Build support for Visual Studio Code This `Visual Studio Code` extension provides access to the `Auto Build` script. ## Installation Get the MarlinFirmware repository from GitHub. Open the directory `buildroot/share/vscode` and copy the `AutoBuildMarlin` folder to the `Visual Studio Code` extension directory. Relaunch `Visual Studio Code` to complete the installation. To find the `Visual Studio Code` extension directory: - Windows - Use Windows Explorer's address bar to open `C:/Users/USERNAME/.vscode/extensions`. - Mac - Use the Finder's `Go` menu to open `~/.vscode/extensions`. - Linux - In the Terminal type `open ~/.vscode/extensions`. ### 3. Install the PlatformIO extension Click on `View` > `Command Palette...`  Find and click on `Extensions: Install Extensions` 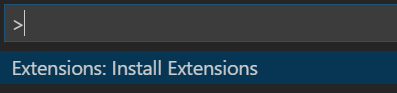 Type `platformio` into the search box and click on `Install` under `PlatformIO IDE`. 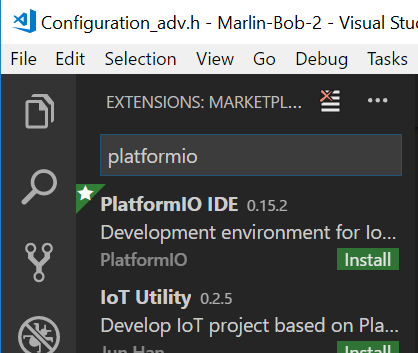 ## Usage This extension adds the Auto Build icon  to the Activities bar. ### 1. Open the Marlin folder Click on `File` > `Open Folder...` 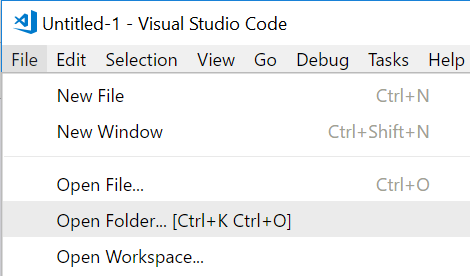 This brings up the `Open Folder` dialog. Select the folder that has the `platformio.ini` file in it.  You should see something like the following. If not, click on the Explorer icon in the Activities bar.  ### 2. Click on the Auto Build Icon  This brings up the Auto Build menu icon bar.  ### 3. Click on one of the four icons -  - Clicking on it starts `PIO Build` -  - Clicking on it starts `PIO Clean` -  - Clicking on it starts `PIO Upload` -  - Clicking on it starts `PIO Upload (traceback)`